This is a simple pseudo 3D rendering of a heart. The little buzzing pink dots will zip between points and choose a new direction at each point. Sweep your mouse across the heart to swivel the heart.
The Chinese phrase 『愛老虎油』 literally translates as "Love tiger oil",.. but then it's not supposed to be literally translated. This is a play on words, or sounds of the words to be more exact. The pinyin transliteration for the Chinese looks like "Ài lǎohǔ yóu". Sometimes when a Taiwanese speaker says these words in Chinese, using a very thick Taiwanese accent, it sounds remarkably similar to "I love you"! Google Translate does a very mediocre job of pronouncing it - Click through and click the speaker button on the grey translation box.
Recently I stumbled across an excellent photo/postcard collection of Taiwan from yonder year. I am a big fan of Tainan, a city in the southern half of the island; So have decided to go to some of these locations to take current photos to compare against the historical counterparts. The first thing I wanted to do was download an mobile app that would facilitate this desire, only to find that there was either no free app to do so, or no such thing at all. Well here I present a prototype for such an app.
Example and/or Goal
Here is a photo I took in Tainan, and it's historical counterpart I found on the internet. I tried to get a close match, but unfortunately at the time the road was quite busy and wandering around in between speeding cars to find a perfect angle was not as a high priority as I initially imagined.
Demo on CodePen
(The app will ask to use your webcam if it is present. A similar question will be asked if using your mobile.)
A full-page (unlike the pen above) linkable version can be found at http://cullen.co.za/project/thenAndNow. On my mobile I have created a shortcut to open this in my browser, which is the closest I am probably going to bundle this into any mobile-app form.
A customer asked us recently to design their webpage and they were very certain they wanted a "Video background like AirBnb has". I searched the net a bit and found several sources of info, some of which were quite different, and some of which were straight out contradictory. After fiddling for several hours with all the different ideas presented, I settled on something that I found met most of my requirements. Here I present a boilerplate which you can customize to create your own video background header.
Goals
The short and curly of it is that I wanted a CSS/HTML combination that gave me a video background over which I could lay any other HTML and style them.
The video should auto play as the page loads.
The video should always fill and cover the element it is a background for, vertical and horizontal device profiles alike.
If loading the video is slow or fails, then a placeholder image should be ready in it's place.
The video and layout above it should render as expected on as many devices and platforms possible.
Demo on CodePen
In my pen I did not want to link to any other offsite resources, so I inlined and compressed the video in JS. I would advise anyone else to rather render the appropriate static HTML (provided but commented out) that points to actual video files that can be optimised themselves.
Recently I had the need to FTP some files in the old Classic ASP platform. The catch is that I need it to be in JScript (Javascript for IIS). In my experience most people use VB script in their ASP environment,. the past few years I have grown to prefer using JScript. If you'd like to use VBScript to FTP then might I suggest this great source. It is from this that I have adapted my JS version.
FTP in ASP (JScript)
In my current environment I never use serverside JScript to render HTML, rather only to serve in a JSON based API format. For the purposes of sharing, I trimmed down the scaffolding into the bare necessities and was left only needing a JSON polyfill: JSON polyfill that works in ASP JScript.
var ftp = (function() {
/*
* Copy a file(s) to a directory on a remote FTP server.
*
* Adapted from the very usefull post @ http://benmeg.com/code/asp/ftp.asp.html
*/
function copyTo(address, username, password, remote_directory, files_to_put, isBinary) {
var objFSO = Server.CreateObject("Scripting.FileSystemObject"),
oScript = Server.CreateObject("WSCRIPT.SHELL"),
oFileSys = Server.CreateObject("Scripting.FileSystemObject"),
objTextFile, oScriptNet, oFile, strCMD, strTempFile,
strCommandResult = '',
uniqueNumber = '__'; // This is for you to implement a random key on your system (if required).
// Build our ftp-commands file
objTextFile = objFSO.CreateTextFile(Server.MapPath('ftpCommand' + uniqueNumber + '.ftp'));
objTextFile.WriteLine('lcd ' + Server.MapPath('.'));
objTextFile.WriteLine('open ' + address);
objTextFile.WriteLine(username);
objTextFile.WriteLine(password);
// Check to see if we need to issue a 'cd' command
if (remote_directory != '')
objTextFile.WriteLine('cd ' + remote_directory);
objTextFile.WriteLine('prompt');
// If the file(s) is/are binary (i.e. .jpg, .mdb, etc..)
if (isBinary)
objTextFile.WriteLine('binary');
// If there are multiple files to put, we need to use the command 'mput', instead of 'put'
if (files_to_put.indexOf('*') > -1)
objTextFile.WriteLine('mput ' + files_to_put);
else
objTextFile.WriteLine('put ' + files_to_put);
objTextFile.WriteLine('bye');
objTextFile.Close();
delete objTextFile;
// Pipe output from cmd.exe to a temporary file
strTempFile = Server.MapPath('ftpOutput-' + uniqueNumber + '.ftp');
// Use cmd.exe to run ftp.exe, parsing our newly created command file
oScript.Run('cmd.exe /c ' + 'ftp.exe -s:' + Server.MapPath('ftpCommand' + uniqueNumber + '.ftp') + ' > ' + strTempFile, 0, true);
oFile = oFileSys.OpenTextFile(strTempFile, 1, false, 0);
// Grab output from temporary file
strCommandResult = oFile.ReadAll();
oFile.Close();
// Delete the temporary & ftp-command files
oFileSys.DeleteFile(strTempFile, true);
objFSO.DeleteFile(Server.MapPath('ftpCommand' + uniqueNumber + '.ftp'), true);
delete oFileSys;
delete objFSO;
return {
result: strCommandResult.split('\r\n')
};
}
return {
copyTo: copyTo
};
})();
Recently I had the need to source data from Excel files in the old Classic ASP platform. There are some good resources online which can help you with this, but I thought I'd log my little experience here which may hopefully expedite the process for someone else someday :)
In my experience most people use VB script in their ASP environment,. the past few years I have grown to prefer using JScript. I'll provide my testing in both.
A Little Environment Preface
In my examples I will have a file called unlocodes.xlsx placed in the directory c:\temp\
The content of the Excel file looks like this:
ASP (VB)
Here is a barebones ASP sample connecting to the Excel file.
This resulted in:
ASP (JScript)
Here is a JScript sample connecting to the Excel file. In my current environment I never use serverside JScript to render HTML, rather only to serve in a JSON based API format. I trimmed down the scaffolding into the bare necessities: an Excel interface and a JSON polyfill that works in ASP JScript.
This resulted in:
Some Extra Notes
I crossed paths with two errors, both of which were resolved by simply choosing the correct connection string. This error:
ADODB.Connection error '800a0e7a'

Provider cannot be found. It may not be properly installed.
and this error:
Microsoft JET Database Engine error '80004005'

External table is not in the expected format.
The ConnectionStrings.com website is a great resource for finding a connection string compatible with your installed version of Excel. I found that on my machine with Excel 2010 this connection string worked:
If you continue to have problems finding the correct driver, or it complaining it's not installed, then be sure to download and install the Microsoft Access Database Engine 2010 Redistributable. This includes the latest ACE drivers which come in 32 and 64 bit flavors. For posterity you may want to try install the 64bit version in command line using the follwoing syntax:
The primary goal was to create an easy way to include multi-line (lots) of CSS using Javascript.
Can reduce number of files in a JS plugin or project (My goal was one).
A test run at jsperf.com shows that injecting CSS rules for a vast number of elements is very fast.
There are already some existing CSS injection tools, but I wanted something dead-simple. There is a great library called VeinJS, which does so much more than mine in many different ways. But after perusing through the examples I knew that I would have to dismantle my CSS too much. What I wanted was something like what you will see in the example below.
Example Usage
With RequireJS
With no dependencies
Compatability
Tested successfully on:
Chrome (+mobile)
Firefox
Safari (+mobile)
IE 10+
Due to the older IE browsers not allowing the innerHTML property to be set on certain elements, this will not work in them.
Download
The code is on GitHub. Download, use and modify as you please.
I'm often curious how so many websites still serve anchor <a> tags with targets set to "_blank".
I recently started browsing through www.104.com.tw, and was horrified to see how many times I was forced onto a new tab. A quick analysis showed me that 43% of the links on my profile editing page had a blank target set. ermahgerd.
This leads me to wonder if this is a conscious decision of the 104 developers. As a user I am consciously deciding my target on every single mouse click on an anchor/link. If I want it open in a new tab, then I middle-click (or ctrl-click),.. the ability to choose a new tab vs. current tab has long been given to me and the rest of the users of the world,.. why would some websites still decide to try force the user to use a new target?
I ran the following snippet of Javascript over a small sample of websites (some from Alexa top 10, some drawn from a hat).
Resulted in this log of results, which I've tried to summarize below.
The average use of _blank targets per country looked something like this for my sample:
Now I understand my sample is small (<50 pages); Edge cases may be skewing the statistic, but I it's fairly evident that some countries are definitely more accustomed to closing browser tabs than middle-clicking their mouse.
The top 13 results from my sample (excluding search result pages) looked like this:
Looking past the fact the top few sites have such a huge ratio of _blank targeted links, it's amazing that on the landing page of these Chinese sites the links number in the order of thousands.
It was also interesting comparing Bing's, Yahoo's and ebay's localized sites across the countries in question. It seems these sites have tailored their UX appropriately for their market.
Bing
Yahoo
ebay
If I had time to do this again properly, I would like to automatically crawl a more substantial sample of sites. The manual nature of my data-capture forced my sample to be focused and probably unfit for using in any real diagnosis.
Here's a good article to read. Agree or disagree with the use-cases, either way I hope more developers choose to use blank or new targets more appropriately.
For nearly as long as I can remember, I've been trying to simplify my programming projects by breaking down long repetitive tasks down into as short and concise steps as I can. I shudder to think of the hours in my life spent putting together a web page that reads a list of items from a database, filters or transforms them, then renders out the appropriate html and attachments. So many times have I done this, across many languages, projects, and technologies.
For the past two years I've been reforming my interest in web, to an interest in mobile web. During this time, I've also run through all my regular distractions like creating a little mobile RSS reader, a mobile client profile database for a cousin, a mobile plumbing inspection checklist for another friend. All these very different projects have a lot in common. They need to capture, edit, delete and list objects. Throw in a little menu navigation and there you have a system. My goal with this PHP/JQM MVC project is to turn my dev cycle for small projects into 90% deciding what I want, 10% typing it in.
Now since I'm targeting mobile devices, form layout can simply default to a vertical list of form controls down the page. All that's really left is deciding what data needs to be captured in my simple data capture app. Here's an example set of definitions...
The Client Profile Demo
There are three object models there: A client, a client state, and a product. Clients have several details, among which is a state. They can be in only one state at a time. Clients can have many products. That may or may not look like a lot,.. but what does it get you?
Six tables in your database, three data tables, each with a respective log table tracking all changes
An API on the serverside to manipulate that data
Clientside forms to edit instances of each of the models
Some simple regex error detection in the forms
Overview and list pages to navigate the data
A dashboard to hold it all together
The login procedure and managing users are also thrown in already
Here's some screen grabs of the app produced by the above definitions:
Download and Setup
You can freely download, copy, hack and sell this project from GitHub. To setup your own mobile app, the general process is as follows:
Copy this project folder into your htdocs or respective web directory
Edit the app/schema.json file to define your models and views
Delete any existing app/database.sqlite files (if you want to start from a clean slate)
Open api/check.php in a browser. This will create any tables that don't exist
Now open your mobile web app in a browser window
Some Caveats
As per usual, I offer this simply as a mostly working prototype. I was actively working on this project more than a year ago, but since then time and priority has led to the inevitable disregard of maintaining it. I still use it often when I need a little admin panel for a website or project I'm working on. I find it workable, but there are definitely bugs, and features half baked in. Have fun with it.
The above means that the imageserver has decoded the URL, downloaded it, saved it in JPEG format (configurable), and returned a key for you to address that image in the future. The key is simply a hash of the URL passed in.
Reading an Image
Calling the API with parameters something like this (using the token from above):
Will return an image in the default size and cropping.
The read key in this example is simply set to a tilde (~) as security for reading images out of this store is of no concern. To specify a size/cropping scheme, append one of the predefined sizes as another parameter:
Where s has been setup as a "small" version of the image.
Demo Settings File
My Experience on a Hosted Solution
I use the GridService product offered by MediaTemple for my hosting. I followed this article to get the ImageMagick PECL working. But ended up discovering that the extension was quite limited compared to the native console convert. So I fell back to using PHP's exec.
So lately I've been putting a lot of thought into what I'll have chopped onto my arm next. The space I have parked for said tattoo is the back of my upper arm, an area I can't really see without aid of a mirror or contorting my head in directions I shouldn't be. So for the third or fourth time in my life now I jumped head first into Blender, with the primary goal of just being able to view my tattoos (and potentials) from another persons point of view.
It didn't take long for me to circle round back to web technologies, and found the fabulous x3dom project. They have a myriad of easy-to-follow tutorials and examples which show you how to export X3D from Blender, and then manipulate/interact with your model/scene in the browser.
I claim no special intimate knowledge of the technology, but I was quite pleased with the features I stumbled across. By simply including a few lines in my HTML, along with one JS and one CSS resource provided by x3dom, a scene is able to be built in the browser on canvas. Very little leg work required to get a basic explorable model onto a web page. The 3D scene is rendered to canvas, then also updated in a DOM structure, both staying in sync. So in order to manipulate your scene you can simply fiddle with the DOM objects (using JQuery or something similar if you wish) - and since X3D is an XML/tag based format, learning what to change and discovering properties is as simple as perusing through the source of your scene file.
Some short-comings may be browser support. x3dom has a comprehensive list of supported platforms and browsers. It seems that Chrome and Firefox are the safest bets, and thankfully the world has slowly moved away from the failures of the previous IE development teams. The other shortcoming that my little test suffers from is too-large-a-size that is preferable for the web. I guess I could have spent more time trying to simplify the model I found online and shrinking my images to more optimal sizes. If only time was not such a precious commodity.
Well enough jibber-jabber, here is the output of approximately 5 hours of fumbling through Blender, Photoshop, and some fiddling in the final HTML.
Left mouse drag to rotate
CTRL-left mouse to drag the object
Mouse scroll to zoom in and out
My final thought or idea that I will probably never end up doing, but seems really easy to achieve now in retrospect, is to create a webpage or mobile app that could grab an image, and paste it to a variety of locations on a model's body. Probably also allow someone to selfie and paste their mugshot on the model, a little bit of fine tuning controls, and upload to Facebook. Boom. Who wouldn't want to download that app?
pst-obj is a rudimentary utility for setting up a persistence layer in your app for node. It extends an object with a single non-enumerable function that allows you to persist that object to a specified file location. When stored the object is serialized to JSON format and stored in a UTF-8 character encoded file.
Quite often now I'm finding myself creating little doodads in nodejs. My latest invention [read distraction] was a small app to control the light overhead in the room via a relay. It had some automatic triggers defined to flip once text had been detected in certain RSS streams, and of course a small one page one button interface to change the state of the light (mostly to play disco-tech in the office).
It's these low volume low risk types of applications I don't really want to setup a database or any third party services for. I had considered settings file type interfaces, but really much preferred the idea of JSON. (I also wanted half a good reason to publish to npm for a first time.) I've used pst-obj to persist single attribute objects, and some with fairly large (long and deep) data structures - the general rule is, if you know your data can be JSON'ed, then this should suffice as a usable, albeit rudimentary, persistence option.
Example
The above example when started and stopped a few times while also refreshing the page in a browser, should give a result similar to this:
Once upon a time I used to load all of my javascript in the head tag using script includes as the page loaded. Times are a changin', and now we have AMD devices such as RequireJS; Now I can write my JS in modules and load them as and when I need.
When loading all my JS on page load, I normally had some kind of UI control to indicate resources were being loaded. After having converted to RequireJS, this loading time has been divided into smaller more intermittent load times. The problem I've experienced is that sometimes a JS resource gets loaded really slowly, or perhaps it's just big or complicated. For whatever reason, it's not important.. The most important thing is to keep the user updated with whats happening, to have a responsive and active UI.
If a user clicks a button, which indirectly requires remote/new resources, then the response to that button click will only come to pass after RequireJS can download all the required resources. If this response time is too long, then this can confuse the user and/or lead to frustration. Actually,.. whenever I do any XHR or remote requests I want to have the same consistent active UI feedback telling the user what (or something) is happening.
Enter loading.js - A completely over-thought device to display feedback on your UI when it requires the user to wait. You can download all the code from GitHub or you can find a streamlined version of what you're looking for below.
I have tested in the current versions of Chrome (desktop & mobile), Firefox, IE, Safari (desktop & mobile). I don't have much intent in creating fixes for historical versions just yet,.. however I will happily accept pull requests.
This weekend I had the urge to read the state of the game paddle connected to my PC and offer it as a JSON web service. This is but a part of my larger goal to do the same with my LEGO Power Functions through Arduino, then couple all of the aforementioned together; ie: Use a joystick to control LEGO.
I used a Java library called FF4J which in turn is based on the SDL library. I tried to make my Processing sketch as simple as possible while interfacing with the aforementioned libraries.
JSON Output mapping
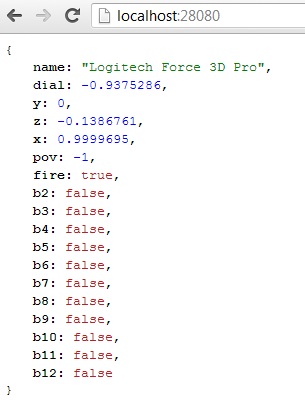
You are able to define a mapping that describes the output format of your JSON web service. It would look something like this, depending on your game controller:
This JSON is defined in [mapping.json]. This allows you to choose custom names for the buttons, axis, and POVs available to you. You can find the code name of the keys by running the app.
Installation
Download and install the SDL Library.
Add the SDL DLLs to processing/java/bin/ folder.
(Plug in your joystick)
Make sure your Joystick is available to SDL ~ Test with dxdiag.exe
Open JoystickService in Processing.
The Result
Once it's running you can view the state of your joystick in the application window. If all is well then open up the service in a browser (localhost:28080 by default). You should see something like this:
For a while I have been developing a NodeJS web app ~ The entire app is service/ajax/socket driven and requires a lot of message passing. I quickly discovered I needed a convenient yet secure way to validate all messages arriving at the server. Enter JSONValidate.js
This one function can be used on both ends of my app to proactively (on the client) and reactively (on the server) bounce faulty data. I have been checking in on the JSON schema standard over the past three years, but I still wanted my schema to have a few more bells and whistles than what the standard was providing ~ So stick it for now, this works fine.
Download
If you're anything like me and don't want to read all my mumbo-jumbo, then you can just go ahead and view and download the code.
At this stage the schema would validate an object with four, non-null appropriately named properties. Let's throw in some extra boundaries and rules...
All properties are assumed to be required (not null) unless so specified (like the weight property).
The regex property is used on string fields. The regex for birthday is simply a date regular expression in format yyyy-mm-dd.
min and max can be used on string and number types.
Next: we can define label and custom.
If a label property is defined and the object being validated fails, the validator will use the label property to describe the error.
The custom property allows for a custom function to be defined in the schema. The function will be given two parameters; the property value, and the object being validated, in that order. The custom function should return an array of strings in the event of data not passing validation; and simply return nothing if validation was successful.
var human = {
  name: { type: 'string', min: 3, max: 120, label: 'Full name' },
  birthday: { type: 'string', regex: /^(19|20)\d\d([- \/.])(0[1-9]|1[012])\2(0[1-9]|[12][0-9]|3[01])$/ },
  weight: { type: 'number', null: true },
  gender: { type: 'string', min: 1, max: 1
    custom: function(v) {
      if (['F', 'M'].indexOf(v.toUpperCase()) == -1)
        return ['Gender must be set to F or M.'];
    }
  },
  deceased: { type: 'boolean' }
};
The last two features worth mention: arrays and sub schemas are both supported as well. Let's add some pets to our human.
var animal = {
  name: { type: 'string', min: 3, max: 120 }
};

var human = {
  name: { type: 'string', min: 3, max: 120, label: 'Full name' },
  birthday: { type: 'string', regex: /^(19|20)\d\d([- \/.])(0[1-9]|1[012])\2(0[1-9]|[12][0-9]|3[01])$/ },
  weight: { type: 'number', null: true },
  gender: { type: 'string', min: 1, max: 1,
    custom: function(v) {
      if (['F', 'M'].indexOf(v.toUpperCase()) == -1)
        return ['Gender must be set to F or M.'];
    }
  },
  deceased: { type: 'boolean' },
  pets: { type: 'object', schema: animal, array: true, null: true }
};
* Recursive behavior is not yet supported. (sad face)
The last code snippet above should validate positively on an object that looks like this:
So a few years ago I spent quite a while using Java to dismantle images from a video feed to detect motion. Using some of the tricks I learned there, I started porting the concept to PHP. Some of my current goals here include but are not limited to the following:
Merging/blending images together.
Finding motion/changes between two or more images.
Reporting said motion/changes as a center coordinate, bounding rectangle, or best yet a vector.
Download
If you're anything like me and don't want to read all my mumbo-jumbo, then you can just go ahead and checkout and download the code on Github here.
Breakdown
First a break down of the main classes... What do they do:
SimpleImage
A class that represents an image. Has functions that help load images from files, stream images to a client, crop, resize, merge/overlay another image, etc.
State
Basically a wrapper for a 2D array of numbers. Provides functions for determining the average, standard-deviation and some other interesting things about said array of numbers. Also some manipulators to filter or change the numbers into other meaningful data. States can be derived from images, or functions of other states.
Code Examples
Blending images together.
What for?
Artificial super long exposure photography.
Part of my process to display motion detection in a feed of images from a webcam.
include "SimpleImage.php";
include "Util.php";

// get a list of images from a subdirectory
$imagePath = "./img/3/";
$files = listFilesInDirectory($imagePath);

// setup an image to work with
$baseImage = new SimpleImage($imagePath.$files[0]);

// setup an array of all other images
$images = array();
for ($i = 1; $i < count($files); $i++)
 $images[] = new SimpleImage($imagePath.$files[$i]);

// merge the latter images into the first image.
$baseImage->merge($images);

// stream image to client
$baseImage->output();
The above process was run on some images like this:
The result looking like this:
Motion/Change detection
In the following example, the actual change is determined within the first few lines. The second half of the code is just there to display results of said detection.
include "SimpleImage.php";
include "State.php";

// setup two images to work with
$i1 = new SimpleImage("./img/4/IMG_0392.JPG");
$i2 = new SimpleImage("./img/4/IMG_0393.JPG");

// setup the states that will work with and interpret the numbers
$state = new State(15, 8, $i1);
$state = $state->difference(new State(15, 8, $i2), rgbColorDistance);
$state->abs()->denoiseStdDev()->scale(10)->round(0);

// for purposes of visual debugging, merge the two images together
$i1->merge($i2);

// using the merged image, layer on a visual of state differences
$result = $state->drawImageIndicator($i1);

// $box will hold an array (x,y,w,h) that indicates location of change
$box = $state->getBoundingBox($i1->getWidth(), $i1->getHeight());
$color = imagecolorallocate($result->getImage(), 10, 255, 10);
imagerectangle($result->getImage(), $box["x"]-1, $box["y"]-1,
 $box["x"]+$box["w"]+1, $box["y"]+$box["h"],
 $color);

// $cog will hold an array (x,y) indicating center of change
$cog = $state->getCenterOfGravity($i1->getWidth(), $i1->getHeight());
imagearc($result->getImage(),
 $cog["x"], $cog["y"], 7, 7,  0, 360,
 imagecolorallocate($result->getImage(), 255, 255, 0));
imagearc($result->getImage(),
 $cog["x"], $cog["y"], 9, 9,  0, 360,
 imagecolorallocate($result->getImage(), 255, 0, 0));

// stream image to client
$result->output();
The above process was run on these two images:
The result looking like this:
Goals for my next version
Add edge detection and island detection (multiple hotspots of change) in one image.
Removing non-still objects from a set of images to produce one still image. (ie: Remove tourists from my picture of some famous monument)
Herein lies details on how to find the Chinese Visa office in Hong Kong from the metro/mrt. It is not difficult to find if you know where it is.
The first time I went I ended up walking around in circles because I didn't know exactly what I was looking for. Following is a description of the fastest route I found to the office from the metro.
* Take the blue line on the metro to Wan Chai Station.
* Go out Exit A5.
* Walk straight out the exit and follow signs toward the Convention Centre.
* Follow the walkway over about 3 roads.
* Before entering Immigration Tower, turn right and go down stairs.
* Walk 50 meters through courtyard, keeping the road on your right. You should approach the corner where there is a crossing.
* Go over the road towards the bridge.
* Once over the road, keep left and go under bridge, not up the stairs.
* Once under the bridge, cross over the road twice and you'll be right there by the entrance to the Visa Office.
Further warnings and info:
* No big bags are allowed through the front door. So basically, if it's got wheels, it's probably too big. Back packs and hand bags are okay.
* You need to pass any small bag you have through a security scanner so obviously don't take anything too dubious with you.
* At the elevator go to the 7th floor.
* On the 7th floor, walk in and turn right and tell the guy you want a visa. He'll give you an application which you need to fill in completely (he will check).
* Once application is filled in take it back to the chap that gave it to you and he'll give you a number.
* Once you have this number you wait for your turn to hand in your application at the front.
Hope that helps someone, someday.
The visa office is in that shorter white building in the middle.
I present to the world my latest invention, FBChatAT. A Facebook Chat Inline Auto Translation tool for Google Chrome. (If you don't use Chrome then click here, install, and be set free.)
When you receive a message in Facebook Chat, the extension will automatically translate that message into your native language, then insert the translated text underneath the original message. This allows you to review/read the original messages and translation simultaneously while you chat.
Secondly.. To type in your native language and have it automatically translated out: An extra textbox is provided at the bottom left of the screen. Type into this box your text will be translated and shown in the space provided above. If/when you are happy with your outgoing message, press 'enter'. This will push the translated text into the current active chat flyout/window. Press 'enter' a second time to push the message into the chat stream.
The default native and foreign languages are English and Traditional Chinese respectively. You can set your preferred languages in the options page of the extension. (Right click FB button in toolbar and choose options).
You may find the full source for this extension on GitHub.
This extension uses Google Translate for the translation.
This idea stemmed from something I've wanted to try for quite a while. That is to train a pet to do something, maybe even something convoluted or unnecessary, to get food or a treat.
Well I finally have the opportunity to build such a contraption. We recently adopted an orphan cat, and have also recently acquired a lot of spare time. So here's the goal. A small machine that dispenses treats when the cat pushes a button. Some design goals:
Large container for cat pellets that empties FIFO style.
Some controlled mechanism of dispensing above-mentioned pellets.
Sensor feedback to indicate when pellets had left the machine.
UI feedback to indicate state of machine. (Ready, Dispensing, Done)
Easy UI for animal to prompt pellet dispensation.
It ended up looking like this..
The cat is meant to press the paddle and then wait for their surprise to pop out the hole. The machine body is made from a cake box and cardboard. Everything was stuck together with cello-tape. Not the best building materials I know but that's all I had at the time.
I thought it was going to be really easy to teach my cat to interface with the machine... Turns out he got impatient quite quickly, and was probably more fascinated with the sound of the spinning motor, than the treats popping out the front.
A breakdown of the electrical components I used:
Arduino Nano
ULN2004A Darlington Array
Some colored LEDS
Resistors. I think anything between 0.5k to 2k should be fine.
Photoresistor.
Stepper motor of your choice
Power source suited to your motor
The following is what I cooked up around the Arduino. A lot of this was trial and error as I am a programmer and not an electrician. Needless to say this was all a large learning curve (which is what I wanted).
The final Arduino Sketch ended up looking like the below. It wasn't all that I'd hoped it would be; I had gotten fed up several times with trying to monitor time based operations on the Arduino. My sketch always seemed to end up dying after a few hours?.. After a while of hopeless debugging I resigned to just removing the offending bits of code. Sad I know, but actually not too bothered since this is all for the cat. The initial more-feature-complete-sketch can be found here. That still has the photoresistor feedback and some other time based functions in it.
int motorPin1 = 2; int motorPin2 = 3; int motorPin3 = 4; int motorPin4 = 5; int spinDelay = 25; // the delay between motor steps int spinAmount = 220; // how many steps should the motor turn? int motorState = 0; boolean motorDirection = true; // used to alternate between motor directions
int redLight = 6; int greenLight = 8;
int buttonPin = 12; // the pin that the pushbutton is attached to int buttonState = 0; // current state of the button
Pushing a button or paddle turned out to be way complicated. I thought a nice big paddle was going to be easy for the cat to just stomp on with his feet. I don't think I could have been more wrong. As intuitive as buttons are to humans, they make no sense to animals. Next time I would place the push button in or on the area where the pellets exit the machine. For a -long- time my cat tried to extract pellets out the machine by pushing his paw in the exit hole. This makes a lot of sense now looking back.
I certainly wouldn't use cardboard and cello-tape to build again. The hardest part to manufacture was a device to let pellets out of the store in a controlled fashion. Moreover, a machine like this needs to be built out of something solid and heavy; More than once we came through to the living room to see the machine knocked over with pellets everywhere.