Tuesday, December 31, 2013

Javascript Loading Animation

Once upon a time I used to load all of my javascript in the head tag using script includes as the page loaded. Times are a changin', and now we have AMD devices such as RequireJS; Now I can write my JS in modules and load them as and when I need.

When loading all my JS on page load, I normally had some kind of UI control to indicate resources were being loaded. After having converted to RequireJS, this loading time has been divided into smaller more intermittent load times. The problem I've experienced is that sometimes a JS resource gets loaded really slowly, or perhaps it's just big or complicated. For whatever reason, it's not important.. The most important thing is to keep the user updated with whats happening, to have a responsive and active UI.

If a user clicks a button, which indirectly requires remote/new resources, then the response to that button click will only come to pass after RequireJS can download all the required resources. If this response time is too long, then this can confuse the user and/or lead to frustration. Actually,.. whenever I do any XHR or remote requests I want to have the same consistent active UI feedback telling the user what (or something) is happening.

Enter loading.js - A completely over-thought device to display feedback on your UI when it requires the user to wait. You can download all the code from GitHub or you can find a streamlined version of what you're looking for below.

I have tested in the current versions of Chrome (desktop & mobile), Firefox, IE, Safari (desktop & mobile). I don't have much intent in creating fixes for historical versions just yet,.. however I will happily accept pull requests.

Download

Example Usage

JQuery & RequireJS

JQuery & SeaJS

Mootools with no module loader

Monday, June 17, 2013

Joystick to JSON/HTTP in Processing

This weekend I had the urge to read the state of the game paddle connected to my PC and offer it as a JSON web service. This is but a part of my larger goal to do the same with my LEGO Power Functions through Arduino, then couple all of the aforementioned together; ie: Use a joystick to control LEGO.
I used a Java library called FF4J which in turn is based on the SDL library. I tried to make my Processing sketch as simple as possible while interfacing with the aforementioned libraries.

JSON Output mapping

You are able to define a mapping that describes the output format of your JSON web service. It would look something like this, depending on your game controller:
{
 x: 'rX',
 y: 'Y',
 z: 'Z',
 dial: 'X',
 pov: 'POV1',
 fire: 'B1',
 b2: 'B2',
 b3: 'B3',
 b4: 'B4',
 b5: 'B5',
 b6: 'B6',
 b7: 'B7',
 b8: 'B8',
 b9: 'B9',
 b10: 'B10',
 b11: 'B11',
 b12: 'B12'
}
This JSON is defined in [mapping.json]. This allows you to choose custom names for the buttons, axis, and POVs available to you. You can find the code name of the keys by running the app.

Installation

  • Download and install the SDL Library.
  • Add the SDL DLLs to processing/java/bin/ folder.
  • (Plug in your joystick)
  • Make sure your Joystick is available to SDL ~ Test with dxdiag.exe
  • Open JoystickService in Processing.

The Result

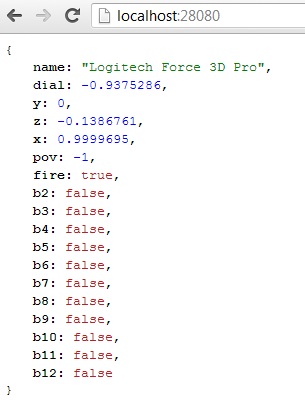
Once it's running you can view the state of your joystick in the application window. If all is well then open up the service in a browser (localhost:28080 by default). You should see something like this:

Download

You can download my processing app folder from JoystickService on GitHub.

Tuesday, May 28, 2013

JSON Validator

For a while I have been developing a NodeJS web app ~ The entire app is service/ajax/socket driven and requires a lot of message passing. I quickly discovered I needed a convenient yet secure way to validate all messages arriving at the server. Enter JSONValidate.js
This one function can be used on both ends of my app to proactively (on the client) and reactively (on the server) bounce faulty data. I have been checking in on the JSON schema standard over the past three years, but I still wanted my schema to have a few more bells and whistles than what the standard was providing ~ So stick it for now, this works fine.

Download

If you're anything like me and don't want to read all my mumbo-jumbo, then you can just go ahead and view and download the code.

Schema Breakdown ~ Let's Build One

A schema is simply a JSON object with a set of properties appropriately named as desired object field names. Let's make a human schema.
var human = {
  name: { },
  birthday: { },
  weight: { },
  gender: { },
  deceased: { }
};
Now we can define type for each property.
var human = {
  name: { type: 'string' },
  birthday: { type: 'string' },
  weight: { type: 'number' },
  gender: { type: 'string' },
  deceased: { type: 'boolean' }
};
At this stage the schema would validate an object with four, non-null appropriately named properties. Let's throw in some extra boundaries and rules...
var human = {
  name: { type: 'string', min: 3, max: 120 },
  birthday: { type: 'string', regex: /^(19|20)\d\d([- \/.])(0[1-9]|1[012])\2(0[1-9]|[12][0-9]|3[01])$/ },
  weight: { type: 'number', null: true },
  gender: { type: 'string', min: 1, max: 1 },
  deceased: { type: 'boolean' }
};
  • All properties are assumed to be required (not null) unless so specified (like the weight property).
  • The regex property is used on string fields. The regex for birthday is simply a date regular expression in format yyyy-mm-dd.
  • min and max can be used on string and number types.
Next: we can define label and custom.
  • If a label property is defined and the object being validated fails, the validator will use the label property to describe the error.
  • The custom property allows for a custom function to be defined in the schema. The function will be given two parameters; the property value, and the object being validated, in that order. The custom function should return an array of strings in the event of data not passing validation; and simply return nothing if validation was successful.
var human = {
  name: { type: 'string', min: 3, max: 120, label: 'Full name' },
  birthday: { type: 'string', regex: /^(19|20)\d\d([- \/.])(0[1-9]|1[012])\2(0[1-9]|[12][0-9]|3[01])$/ },
  weight: { type: 'number', null: true },
  gender: { type: 'string', min: 1, max: 1
    custom: function(v) {
      if (['F', 'M'].indexOf(v.toUpperCase()) == -1) 
        return ['Gender must be set to F or M.'];
    } 
  },
  deceased: { type: 'boolean' }
};
The last two features worth mention: arrays and sub schemas are both supported as well. Let's add some pets to our human.
var animal = {
  name: { type: 'string', min: 3, max: 120 }
};

var human = {
  name: { type: 'string', min: 3, max: 120, label: 'Full name' },
  birthday: { type: 'string', regex: /^(19|20)\d\d([- \/.])(0[1-9]|1[012])\2(0[1-9]|[12][0-9]|3[01])$/ },
  weight: { type: 'number', null: true },
  gender: { type: 'string', min: 1, max: 1,
    custom: function(v) {
      if (['F', 'M'].indexOf(v.toUpperCase()) == -1) 
        return ['Gender must be set to F or M.'];
    } 
  },
  deceased: { type: 'boolean' },
  pets: { type: 'object', schema: animal, array: true, null: true }
};
* Recursive behavior is not yet supported. (sad face) The last code snippet above should validate positively on an object that looks like this:
{
  name: 'Victor Challis',
  birthday: '1982-12-14',
  weight: null,
  gender: 'M',
  deceased: false,
  pets: [
    { name: 'Alex' }, 
    { name: 'Pat' }
  ]
};
In case you didn't see it at the top, you can experiment with the validator on JSFiddle.net.

Wednesday, March 27, 2013

PHP Image Comparison: Motion Detection

So a few years ago I spent quite a while using Java to dismantle images from a video feed to detect motion. Using some of the tricks I learned there, I started porting the concept to PHP. Some of my current goals here include but are not limited to the following:
  • Merging/blending images together.
  • Finding motion/changes between two or more images.
  • Reporting said motion/changes as a center coordinate, bounding rectangle, or best yet a vector.

Download

If you're anything like me and don't want to read all my mumbo-jumbo, then you can just go ahead and checkout and download the code on Github here.

Breakdown

First a break down of the main classes... What do they do:
SimpleImage
A class that represents an image. Has functions that help load images from files, stream images to a client, crop, resize, merge/overlay another image, etc.
State
Basically a wrapper for a 2D array of numbers. Provides functions for determining the average, standard-deviation and some other interesting things about said array of numbers. Also some manipulators to filter or change the numbers into other meaningful data. States can be derived from images, or functions of other states.

Code Examples

Blending images together.
What for?
  • Artificial super long exposure photography.
  • Part of my process to display motion detection in a feed of images from a webcam.
include "SimpleImage.php";
include "Util.php";

// get a list of images from a subdirectory
$imagePath = "./img/3/";
$files = listFilesInDirectory($imagePath);

// setup an image to work with
$baseImage = new SimpleImage($imagePath.$files[0]);

// setup an array of all other images
$images = array();
for ($i = 1; $i < count($files); $i++)
 $images[] = new SimpleImage($imagePath.$files[$i]);

// merge the latter images into the first image.
$baseImage->merge($images);

// stream image to client
$baseImage->output();
The above process was run on some images like this:
The result looking like this:
Motion/Change detection
In the following example, the actual change is determined within the first few lines. The second half of the code is just there to display results of said detection.
include "SimpleImage.php";
include "State.php";

// setup two images to work with
$i1 = new SimpleImage("./img/4/IMG_0392.JPG");
$i2 = new SimpleImage("./img/4/IMG_0393.JPG");

// setup the states that will work with and interpret the numbers
$state = new State(15, 8, $i1);
$state = $state->difference(new State(15, 8, $i2), rgbColorDistance);
$state->abs()->denoiseStdDev()->scale(10)->round(0);

// for purposes of visual debugging, merge the two images together
$i1->merge($i2);

// using the merged image, layer on a visual of state differences
$result = $state->drawImageIndicator($i1);

// $box will hold an array (x,y,w,h) that indicates location of change
$box = $state->getBoundingBox($i1->getWidth(), $i1->getHeight());
$color = imagecolorallocate($result->getImage(), 10, 255, 10);
imagerectangle($result->getImage(), $box["x"]-1, $box["y"]-1, 
 $box["x"]+$box["w"]+1, $box["y"]+$box["h"], 
 $color);

// $cog will hold an array (x,y) indicating center of change
$cog = $state->getCenterOfGravity($i1->getWidth(), $i1->getHeight());
imagearc($result->getImage(), 
 $cog["x"], $cog["y"], 7, 7,  0, 360, 
 imagecolorallocate($result->getImage(), 255, 255, 0));
imagearc($result->getImage(), 
 $cog["x"], $cog["y"], 9, 9,  0, 360, 
 imagecolorallocate($result->getImage(), 255, 0, 0));

// stream image to client
$result->output();
The above process was run on these two images:
The result looking like this:

Goals for my next version

  • Add edge detection and island detection (multiple hotspots of change) in one image.
  • Removing non-still objects from a set of images to produce one still image. (ie: Remove tourists from my picture of some famous monument)
Tuesday, February 26, 2013

Getting a Chinese Visa in Hong Kong

Herein lies details on how to find the Chinese Visa office in Hong Kong from the metro/mrt. It is not difficult to find if you know where it is.
The first time I went I ended up walking around in circles because I didn't know exactly what I was looking for. Following is a description of the fastest route I found to the office from the metro.
* Take the blue line on the metro to Wan Chai Station.
* Go out Exit A5.
* Walk straight out the exit and follow signs toward the Convention Centre.
* Follow the walkway over about 3 roads.
* Before entering Immigration Tower, turn right and go down stairs.
* Walk 50 meters through courtyard, keeping the road on your right. You should approach the corner where there is a crossing.
* Go over the road towards the bridge.
* Once over the road, keep left and go under bridge, not up the stairs.
* Once under the bridge, cross over the road twice and you'll be right there by the entrance to the Visa Office.

Further warnings and info:
* No big bags are allowed through the front door. So basically, if it's got wheels, it's probably too big. Back packs and hand bags are okay.
* You need to pass any small bag you have through a security scanner so obviously don't take anything too dubious with you.
* At the elevator go to the 7th floor.
* On the 7th floor, walk in and turn right and tell the guy you want a visa. He'll give you an application which you need to fill in completely (he will check).
* Once application is filled in take it back to the chap that gave it to you and he'll give you a number.
* Once you have this number you wait for your turn to hand in your application at the front.

Hope that helps someone, someday.


The visa office is in that shorter white building in the middle.